Storybook Interactive Testing with MUI

Our team does a lot of our UI development in Storybook. If you are curious about how we manage our business logic, you can read more about how we build our UI components here.
Storybook has been working hard to improve its UI testing features and introduced integrated interactive testing in version 7, where you can build UI tests that can run in your preferred test runner. We decided to try this with our components, and this blog will go into what we have found so far with our experimentation.
Setting up your form story
As mentioned, we use MUI as our design and component base for our components. We also use react-hook-form to build our form management and contentful to manage our page content. These packages and utilities make building components easier, but I noticed some quarks when attempting to build our interactive tests using Storybooks' new feature. To help others, I will walk through an example of our forms and then share some examples of our interactive tests to help others.
To help frame the test, below is an example of one of our forms shortened a little in the interest of brevity.
// imports.. removed for brevity

export interface FormContent {
  overline: string;
  header: string;
  fieldsCollection: ContentfulFormInputCollection;
  button: ContentfulButton;
}

export interface FormFields {
  firstName: string;
  lastName: string;
  dateOfBirth: Dayjs | null;
  gender: string;
  attestation: boolean;
}

export interface FormProps {
  content: FormContent;
  disabledSubmit?: boolean;
  methods: UseFormReturn<FormFields>;
  onSubmit: () => Promise<void>;
}

export const Form = ({
  content,
  disabledSubmit,
  methods,
  onSubmit,
}: AddChildFormProps): JSX.Element => {
  const {
    control,
    formState: { isSubmitting },
  } = methods;
  const { fieldsCollection } = content;
  const gender = getFormFieldProperties({ fieldsCollection, name: 'gender' });

  return (
    <Card variant="standard">
      <CardHeader
        title={
          <>
            <Typography variant="body2" color="sunrise.text-secondary">
              {content.overline}
            </Typography>
            <Typography variant="h3">{content.header}</Typography>
          </>
        }
      />
      <CardContent>
        <Stack spacing={2}>
          <FormTextArea
            control={control}
            name="firstName"
            label={
              getFormFieldProperties({ fieldsCollection, name: 'firstName' })
                ?.label ?? 'First name'
            }
            placeholder={
              getFormFieldProperties({ fieldsCollection, name: 'firstName' })
                ?.placeholder
            }
            isRequired
          />
          <FormTextArea
            control={control}
            name="lastName"
            label={
              getFormFieldProperties({ fieldsCollection, name: 'lastName' })
                ?.label ?? 'Last name'
            }
            placeholder={
              getFormFieldProperties({ fieldsCollection, name: 'lastName' })
                ?.placeholder
            }
            isRequired
          />
          <FormDatePicker
            control={control}
            color="secondary"
            name="dateOfBirth"
            label={
              getFormFieldProperties({ fieldsCollection, name: 'dateOfBirth' })
                ?.label ?? 'Date of Birth'
            }
            disableFuture
            disableHighlightToday
            showDaysOutsideCurrentMonth
            isRequired
          />
          <FormSelect
            control={control}
            name="gender"
            label={
              gender?.label ?? 'Birth Sex'
            }
            placeholder={
              gender?.placeholder
            }
            optionsCollection={
              gender?.optionsCollection
            }
            isRequired
          />
          <Divider
            variant="standard"
            sx={(theme): object => ({
              marginTop: `${theme.spacing(2.5)} !important`,
              marginBottom: `${theme.spacing(2.5)} !important`,
            })}
          />
          <FormCheckbox
            control={control}
            color="sunrise.text-primary"
            name="attestation"
            body={
              getFormFieldProperties({ fieldsCollection, name: 'attestation' })
                ?.body
            }
            isRequired
            sx={{
              marginTop: '0 !important',
            }}
          />

          <Divider variant="standard" />
        </Stack>
      </CardContent>
      <CardActions>
        {isSubmitting ? (
          <LoadingButton color="secondary" fullWidth />
        ) : (
          <Button
            disabled={disabledSubmit}
            onClick={onSubmit}
            testid={`form:submit`}
            type="submit"
            color="secondary"
            fullWidth
          >
            {content?.button?.displayText}
          </Button>
        )}
      </CardActions>
    </Card>
  );
};
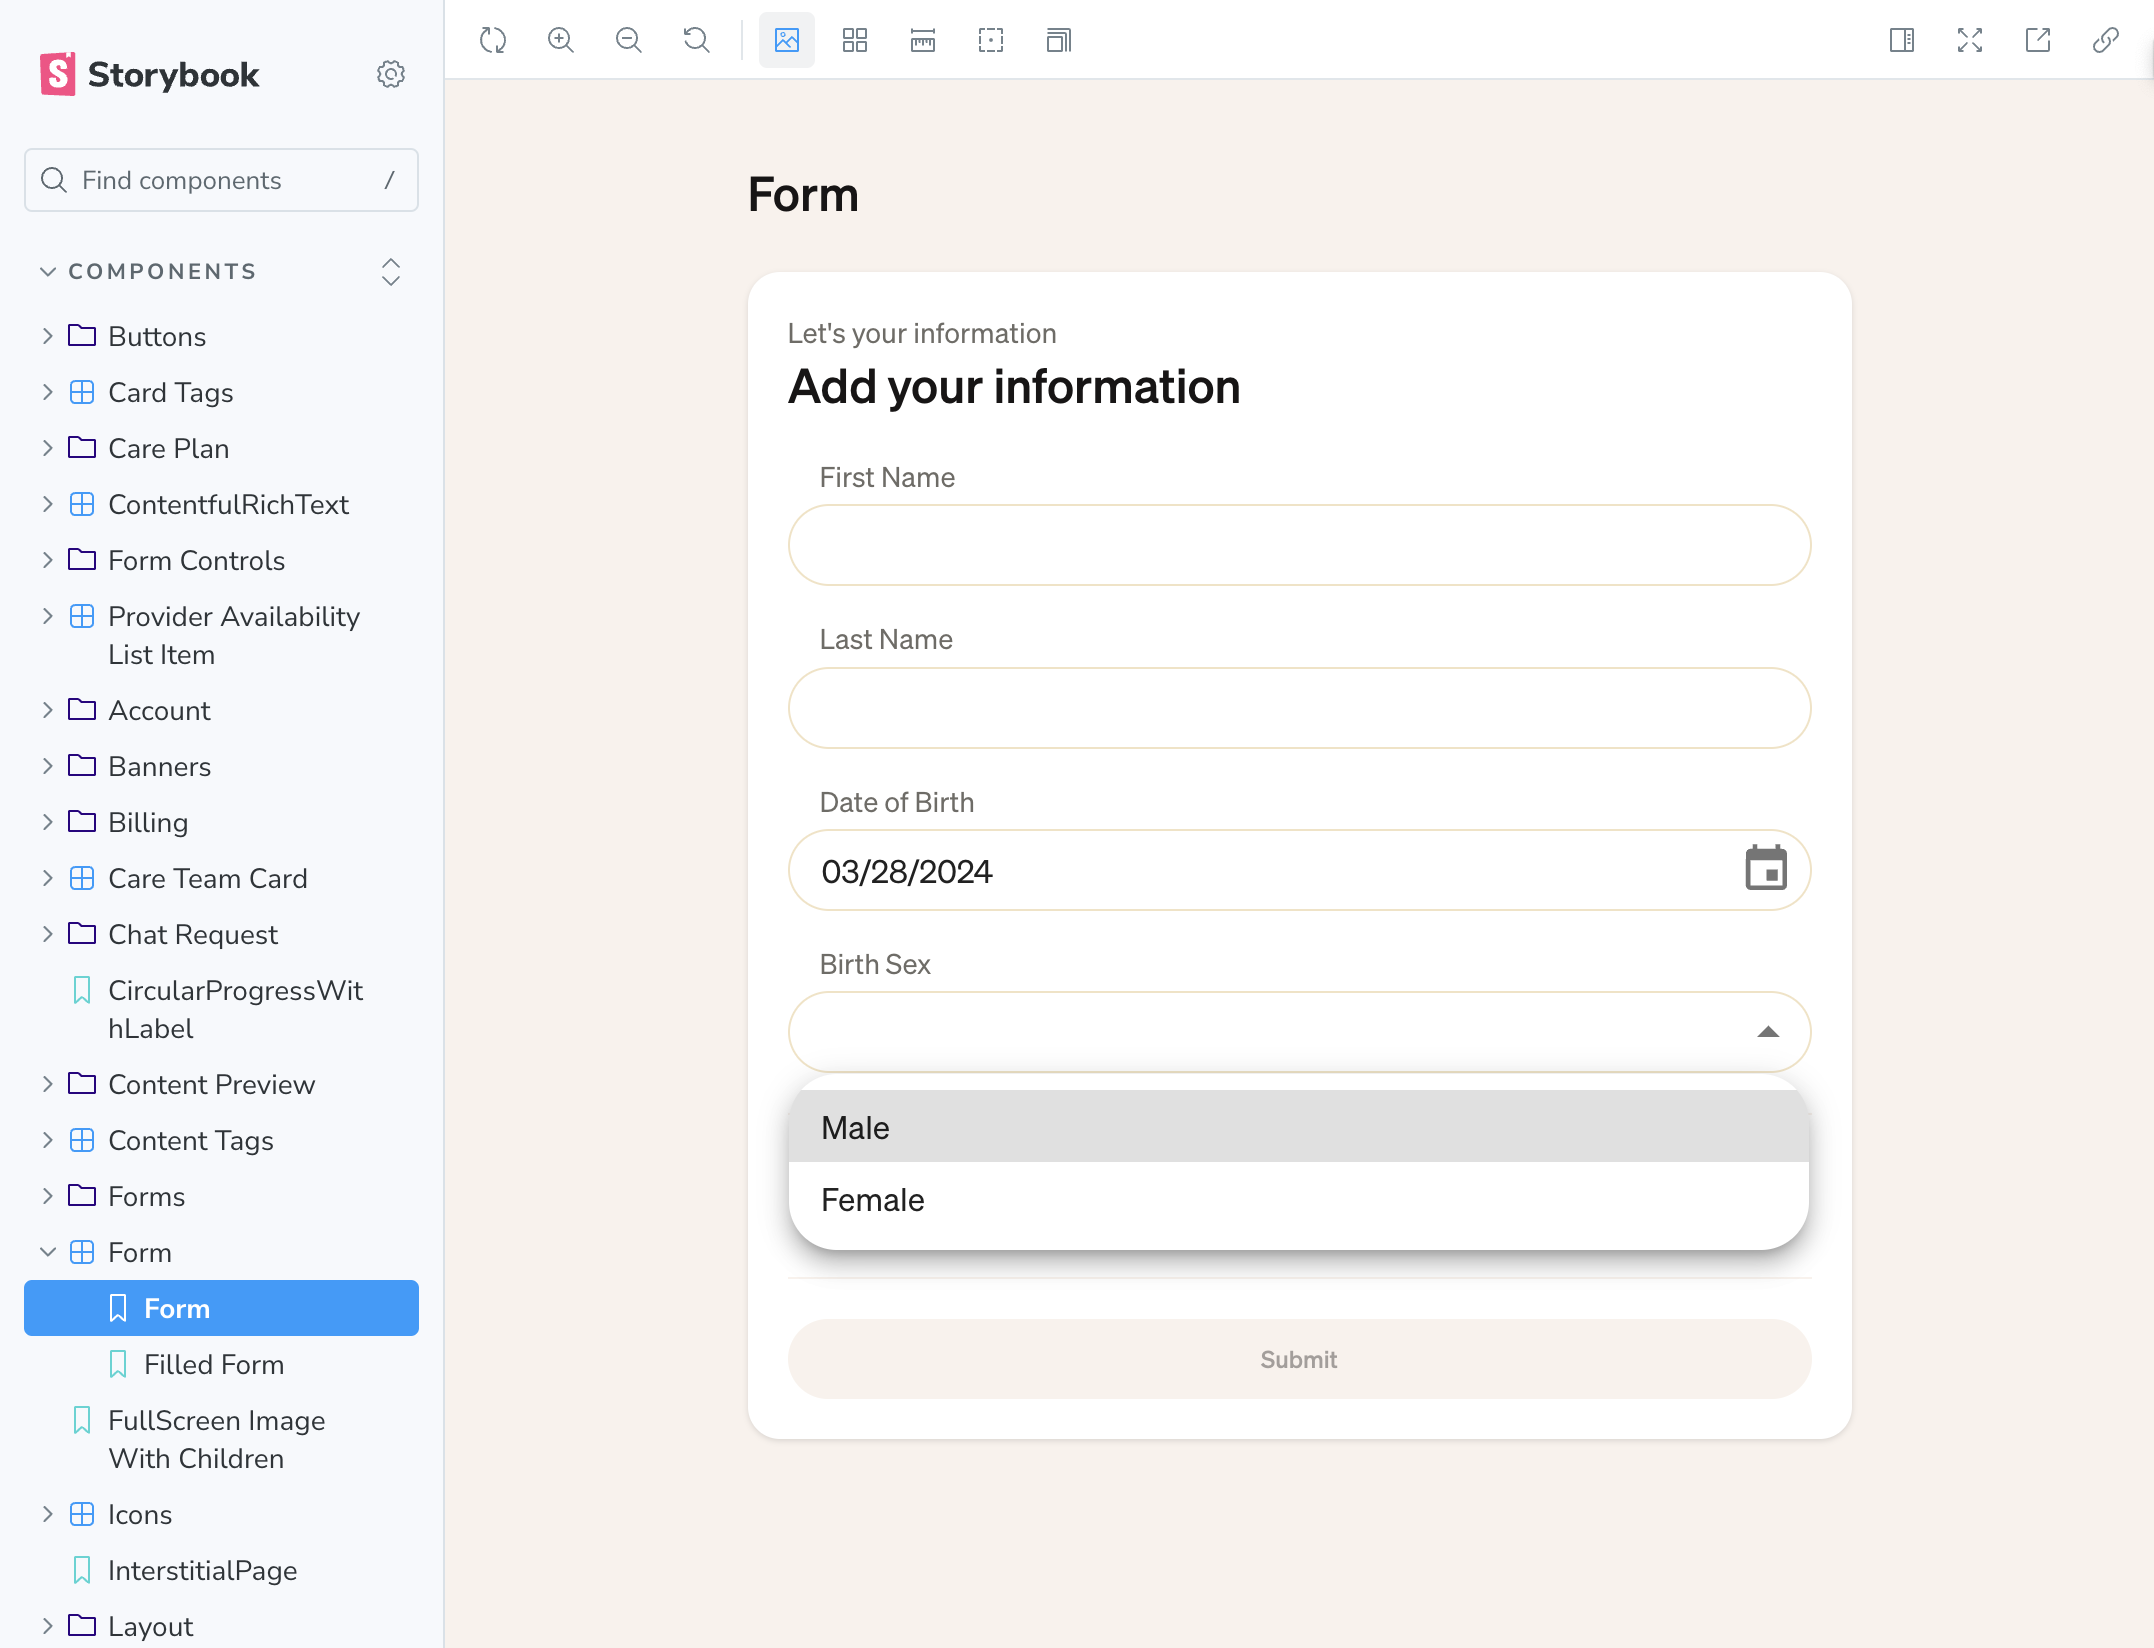
And a screenshot of what our component looks like in Storybook.
Because the form setup happens outside the UI components, we can set up our stories, which build our content and form values for various form states if needed. Below is our simple empty-form story.
import React from 'react';
import type { Meta, StoryObj } from '@storybook/react';
import { userEvent, within } from '@storybook/test';
import { useForm, FormProvider } from 'react-hook-form';
import {
  FormContent,
  FormFields,
  Form as UIForm,
} from '@summer-health/ui/care-form-date';
import dayjs from 'dayjs';

const meta: Meta = {
  component: UIForm,
  title: 'Components/Form',
};

export default meta;
type Story = StoryObj<typeof meta>;

const content: FormContent = {
  overline: "Let's your information",
  header: 'Add your information',
  button: {
    displayText: 'Submit',
  },
  fieldsCollection: {
    items: [
      {
        name: 'firstName',
        label: 'First Name',
      },
      // ... removed for brevity
    ],
  },
};

const render = (): JSX.Element => {
  const defaultValues: AddChildFormFields = {
    firstName: '',
    lastName: '',
    gender: '',
    dateOfBirth: dayjs(),
    attestation: false,
  };
  const methods = useForm<AddChildFormFields>({
    defaultValues,
    mode: 'onBlur',
  });
  const { handleSubmit, formState } = methods;

  // eslint-disable-next-line @typescript-eslint/no-explicit-any
  const onSubmit = handleSubmit((data: any) => {
    // eslint-disable-next-line no-console
    console.log('submit me!', data);
  });

  return (
    <FormProvider {...methods}>
      <UIAddChildForm
        content={content}
        disabledSubmit={!formState.isValid}
        methods={methods}
        onSubmit={onSubmit}
        pageSection="story"
      />
    </FormProvider>
  );
};


export const DefaultForm: Story = {
  render,
};
Now that we have that setup, let's talk about interactive tests. 😊
Interactive testing with forms
Storybook documentation has some simple examples of building an interaction which you can find here. Let's start with the overall interactive test.
export const FilledForm: Story = {
  play: async ({ canvasElement, step }) => {
    const canvas = within(canvasElement.parentElement);

    step('Fill out the form', async () => {
      await userEvent.clear(await canvas.getByTestId('dateOfBirth'));

      await userEvent.type(await canvas.getByTestId('firstName'), 'Jane');
      await userEvent.type(await canvas.getByTestId('lastName'), 'Doe');

      await userEvent.type(
        await canvas.getByTestId('dateOfBirth'),
        '02/02/2024',
      );

      await userEvent.click(await canvas.getByLabelText('Birth Sex'));

      const presentation = within(canvas.getByRole('presentation'));
      await userEvent.click(await presentation.getByTestId('Female'));

      await userEvent.click(await canvas.getByTestId('attestation'));

      await userEvent.click(await canvas.getByTestId('form:submit'));
    });
  },
  render,
};
Now, let's walk through this test line by line.
const canvas = within(canvasElement.parentElement);
If you've looked at the documentation in Storybook docs you will see that they set up their variable canvas by doing const canvas = within(canvasElement);. This will give you the <div id="storybook-root"> element in the iframe. Although this is fine for most tests, if you're using MUI and have modals, popups, or dropdowns, you'll need to be able to access the whole body of your storybook iframe. Since the canvasElement is a DOM element, you can use parentElement to navigate up the DOM to the body element. We can query the body DOM element from here to get any element in the document body. We'll talk more later about why we need to access the whole body when we talk about activating our Select component. For now, let's move to the following line.
await userEvent.clear(await canvas.getByTestId('dateOfBirth'));
Along with using the MUI Select component, our form uses MUI's DatePicker component. When setting up your default form values, if you need to set up your form with a date, you'll need to be able to clear the date before you have the interactive test type in a new date option. You may have noticed that this is higher up in our test setup. This is because of an odd quirk: the value wont be set if you clear it right before typing. As of writing this, I'm unsure if this is an MUI issue or a Storybook issue. Clearing the value early works!
Our basic setup is complete from here, and we can start interacting with the form.
await userEvent.type(await canvas.getByTestId('firstName'), 'Jane');
await userEvent.type(await canvas.getByTestId('lastName'), 'Doe');
The above lines of code find the 2 TextField components in our form by adding a data-testid attribute on our TextField component. In order to make the input field findable in our form, we'll need to add this attribute to our react element. Here is a snippet of our reusable TextField component we drop into all our forms. The inputProps attribute on the TextField component allows us to customize to the input element.
<TextField
  id={name}
  inputProps={{
    'data-testid': name,
  }}
  value={value}
  label={label}
/>
We must now do the same thing to our DatePicker, which we'll interact with next. You'll want to add the data-testid attribute to the input field that is associated with the DatePicker so you can type into it.
<DatePicker
  slotProps={{
    textField: {
      color,
      inputProps: {
        'data-testid': name,
      },
    },
  }}
  value={value}
  onChange={onChange}
/>
Let's now interact with DatePicker.
await userEvent.type(await canvas.getByTestId('birthDate'), '02/02/2024');
Now that we have the date entered, we can move on to selecting gender in our form.
await userEvent.click(await canvas.getByLabelText('Birth Sex'));

const presentation = within(canvas.getByRole('presentation'));
await userEvent.click(await presentation.getByTestId('Female'));
First, we must activate the dropdown that appears with our Select component. Unfortunately, as of this writing, the only way I've found to activate the Select component is by clicking on the label text. Unfortunately, adding data-testid to either the label field or the Select component didn't trigger the dropdown options to appear.
As you'll remember, we use canvasElement.parentElement to access our DOM's body element. Once our dropdown options have been rendered, a new DOM element should be added called presentation. From here, we can query the body DOM to get the presentation div element.
const presentation = within(canvas.getByRole('presentation'));
This presentation div is where MUI renders its modals, popups, and various other components that require that they have the highest z-index order in the DOM. After finding the presentation DOM element, we can select one of our options.
await userEvent.click(await presentation.getByTestId('Female'));
Fortunately, adding a data-testid to our Checkbox component is straightforward. Just add data-testid={name} to your component and it will make your component queryable.
await userEvent.click(await canvas.getByTestId('attestation'));
Calling the click action will now select the checkbox. Since all fields are required for our form to work as expected. Once all fields are filled in our submit button should now be activated. If your form submit button isn't active the test will fail because your button will not be in an active state.
await userEvent.click(await canvas.getByTestId('form:submit'));
In this particular test, we don't need an expect test as we are working to validate that the form activates when all fields are input and that all fields are interactable.
One last gotcha!
You may have noticed in documentation that you can break up interactions into multiple steps. Unfortunately, I've found that doing this doesn't fully fill in the form as expected. It will only partially fill out the form, and the test will fail. I'm unsure if this is an issue with the MUI framework or Storybook interactive testing library. For now, when it comes to forms, I would keep it all in one step.
Time to wrap up!
In our quest to enhance frontend testing, we dove headfirst into Storybook's latest feature: integrated interactive testing. Armed with excitement, we embarked on a journey of exploration, focusing keenly on optimizing form interactions. Storybook's version 7 has truly stepped up its game, seamlessly integrating with various testing runners, providing developers like us with a smoother testing experience.
As we tinkered with form setups within Storybook, we stumbled upon a few quirks, especially given our reliance on Material-UI (MUI), react-hook-form, and contentful. However, armed with determination, we charted a step-by-step path to crafting interactive tests for forms, serving as a beacon of guidance for fellow developers navigating similar waters. Along the way, we tackled nuances like clearing date fields, accessing dropdown options, and ensuring all form fields play nicely to activate the submit button. Although we faced a hiccup when breaking interactions into multiple steps, we pressed on, sharing our insights to foster a community of developers armed with stronger testing methodologies and a sprinkle of camaraderie.